FPGA Programming
18/09/2019, hardwarebee
FPGA programming is a very broad topic that requires skills in a two main domains: hardware and software programming. In this article, we will describe the basis to any FPGA programming project, starting with an overview of FPGA technology, programming languages, the difference between software programming and FPGA programming and last but not least — a guide to FPGA programming.
What is an FPGA?
If you are in the chip design or associated with technology in any sort of capacity, you may be aware of ASICs and FPGAs. FPGA stands for Field Programmable Gate Array and it is basically a silicon chip that can be configured by developers and designers based on the functionality they wish to get from it. What makes FPGAs different from their counterparts (e.g. ASICs) is that they are specifically manufactured to be reconfigurable.

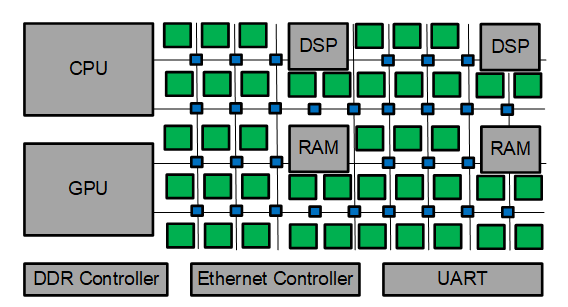
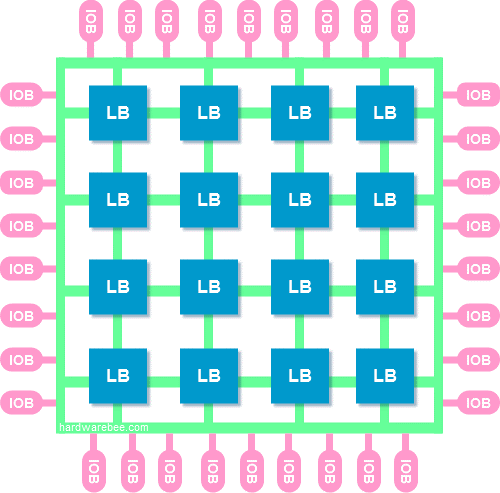
An FPGA chip is composed of logic gates or blocks that can be manipulated and configured as needed using lookup tables, DSP components, memory elements, and gates like AND, OR, and NOT amongst others. The individual blocks or gates are joined together using interconnects which can be configured by the user on a repeatable basis. FPGAs can be configured using Hardware Description Languages such as Verilog HDL or VHDL. The code is written in the above-mentioned languages and it is then verified using various software tools, after which the FPGA is synthesized and run.
The greatest selling point of FPGAs is the fact that they are configurable and programmable by the user. The flexible design enables the user to modify the functionality of the FPGA, as opposed to ASICs which can only be configured once at production level. This makes it ideal for use as a various applications that may require functionality updates in the future.

Due to their programmability, FPGAs are highly flexible in nature and enable users to modify their functionality. Depending on whether you need an FPGA for slow or high-speed applications, you can either use the logic fabric or instead add a soft-core CPU inside the FPGA. This will allow you, for example, to implement your design in software languages such as C and C++.
We wrote about similar FPGA topics before:
FPGA Explained in Simple Words
FPGA Advantages and Common Applications
FPGA Programming Languages: Verilog vs. VHDL
When trying to understand FPGA programming, you need to first to understand one of the two main FPGA programming languages: VHDL and Verilog. These are two Hardware Description Languages (HDL) that are typically used to program FPGA designs. Verilog is a combination of verification and logic, a language based on the C programming language that is primarily used for designing and verification of digital and analog circuits. VHDL, on the other hand, is based on Ada programming language and is dedicated for Very High-Speed Integrated Circuits (VHSIC), started as a modeling of digital and analog signal circuits.
We wrote about Verilog and VHDL and the difference between Verilog and VHDL.
FPGA vs. Software Programming
As you will read ahead, one of the benefits of using FPGAs is the fact that it focuses on parallel execution as opposed to sequential processing, which is the primary difference between the execution of instructions when it comes to FPGA or software processing. In software programming, you give a set of instructions to the system which then executes it in a sequential order in order to achieve a particular objective or complete a given task. In FPGA programming, your focus is on designing the logics of the digital circuits which will subsequently guide the behavior of the semiconductor chip – all hardware elements are operating simultaneously.
We wrote before about the difference between FPGA and CPU in this article.
First Steps in FPGA Programming
Before you start thinking about coding for FPGAs, you need to familiarize yourself with certain terms and concepts such as logic gates, Boolean algebra, and logic circuits and their various types. The next step is to start learning the Verilog or VHDL programming languages.
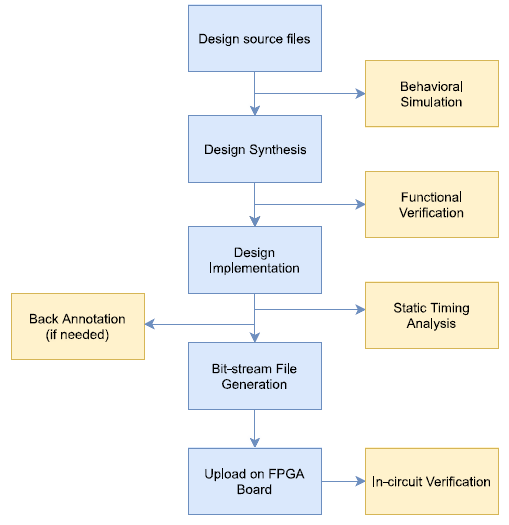
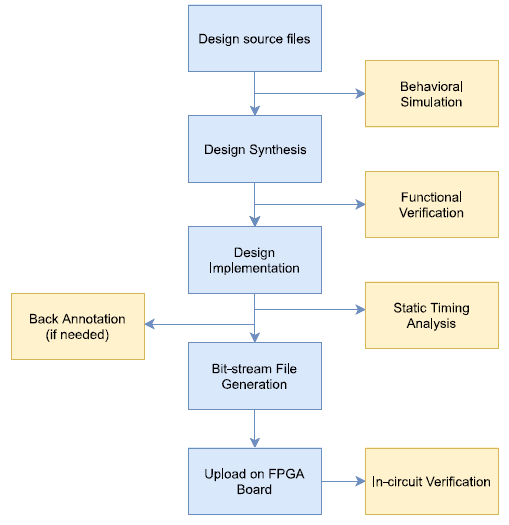
FPGA design flow is also a topic you will need to master. FPGA design flow is based on several tools that you will need to master: editing tool, synthesize tool and a simulation tool. Get yourself familiar with FPGA design flow here.


You will start creating your code using the editor, then you can run a simulation to test your design. You will find a number of simulators available for use out there. The last step, after you have formed a successful design, is synthesis and implementation. You can use a number of tools for this purpose, including the likes of Xilinx and Intel.
If you are still unsure which FPGA type or size would fit best to your project – this article can help.
FPGA Development Board
Once your FPGA design is synthesized and bug free you can use an FPGA development board to test the FPGA functionality in real life. An FPGA development board typically has on board LEDs, switched and various interfaces and ports that can help you debug your code and check it’s functionality in real life. Read more about FPGA development boards here: How to Choose an FPGA Development Board?
First FPGA Programming
If this is the first time you try to program an FPGA, we highly recommend that you use these two tutorials that include both the source code and guidance on how to start the FPGA programming process and get through all steps until completion. Here are the articles: Adding a CPU to your FPGA design, and a step by step guide to FPGA programming.
Further Reading:
10 Top Mistakes in FPGA Programming
FPGA Advantages and Most Common Applications Today
The Ultimate Guide to FPGA Clocks


